Understanding Babel within your JavaScript Project
When Ecma International created ECMAScript, developers were quick to adopt the standardized language for multiple reasons. The updated JavaScript syntax is more readable and requires less syntax, increasing economy of the code. Common bugs resulting from ES5 were mitigated with new ES6 syntax. Finally, among other improvements, the ES6 syntax has more similarity with other languages which opens the door for more experienced developers to easily grasp the language.
Because ES6 was standardized for cross-browser functionality, popularity amongst developers was sure to be strong. While individual browsers would be unable to develop support fast enough. Ecma anticipated this and made sure that ES6 was backwards compatible.
This is where Babel comes into play. Babel is a JavaScript library that transpiles ES6+ to ES5. Due to the many solutions and benefits from ES6, Babel was necessary for developers to utilize the language across all browsers.
I’m going to show you, step by step, how to include Babel in a simple Javascript project.
NPM INIT
First we will need to setup npm(node package manager). This will give us access to Node packages, which are prewritten packages containing JavaScript code. Running npm init will create a package.json file in your project directory. It’s best practice to include a name and description for prompts presented after running npm init — anything else is not necessary, you can skip through by pressing Enter.

NPM INSTALL
In order to use npm packages (Babel is a JavaScript library), we need to install them using npm install . This will create a folder called node_modules and copy the package files into it.
We need to install Babel command line tools using npm install babel-cli -D and babel-preset-env using npm install babel-preset-env -D .This gives us the Babel command line tools and the package which maps ES6+ to ES5.
The -D flag tells npm to add the package to the devDependencies property in package.json. This allows other developers to install the projects dependency packages simply with npm install instead of individually.
Specify version of source code
Babel will need to know what version the initial file being transpiled is set in. We can do so simply by creating a .babelrc file in the root directory. Inside the new file, create an object with a key of “presets” and a value [“env”].

Specify scripts in package.json
Inside of package.json, we need to specify a command line script to initiate transpiling. In the above picture of package.json you will see a property called scripts , which holds an object with key-value pairs specific to each command line shortcut.
Within scripts there is a key-value pair of "build": "babel src -d lib". Here, "build" is the command, with a value of "babel src -d lib". This is telling babel to transpile the contents of src file, -d is instructing babel to create a new directory for transpiled code, and lib is the name of the new directory. “Babel, take the contents of the src folder, transpile it and create a new file called lib to put it in”.
NPM RUN BUILD
Finally, you can run npm run build which initiates Babel to transpile code from src folder and create a directory lib to put it in.
Test the magic!
Before Babel:

After Babel:
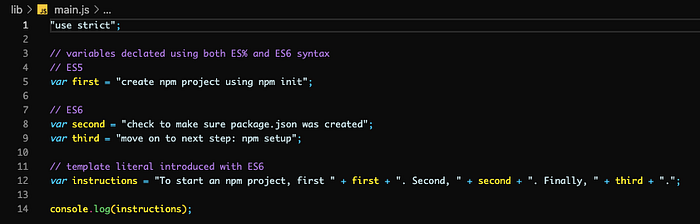
You can execute both files from your command line using node src/main.js and node lib/main.js respectively.
I hope this was helpful in helping you understand what Babel does and why it’s necessary for developers today!!!
